

- Best Polygel Nail Kits And Application Guide - June 12, 2022
- 18 Purple Nails Inspiration and Ideas - April 16, 2022
I love doing my nails at home. When the pandemic hit and salons closed, I was curious to see if I could do my own nails for a fraction of the cost. After many different trials and many nail kits later, I’ve finally found the easiest kind of nails to do, which are Polygel nails.
To help you decide on the best kits to choose from, I’ve compiled this list for you. Keep reading to find out which might be the best for you!
Bottomline Upfront
Out of all the kits on this list, I suggest that you go for the Modelones Poly Gel Nail Kit. It has everything that you need to do a beautiful manicure. I love everything about this kit, even down to the packaging! You will need to pick up an LED curing light, but a quick trip to Amazon will be just what you need.
What Are Polygel Nails?
Polygel nails are a combination of gel and acrylic. The idea behind them is that they have the durability of acrylic nails and the flexibility of gel nails.
They are created with the use of dual forms, which look like false nail tips. However, instead of gluing them on and building the Polygel on top, you fill the dual form with Polygel and cure it to create a false nail.
Selection Criteria
For these kits, I based my top favourite choices based on quality, availability, kit contents, and brand communication. There are endless kits out there that include a range of products, but I picked the ones that had products of good quality and sturdiness, as cheap nail products will make your manicure not last very long. I also selected kits that included pretty much everything you need to do a poly gel manicure.
If this is your first time doing your nails on your own, it can be tricky if you don’t have a lot of products yet. There will always be a few items you may need to pick up on the side, but at least these kits will provide you with almost everything you need.
My Top Picks
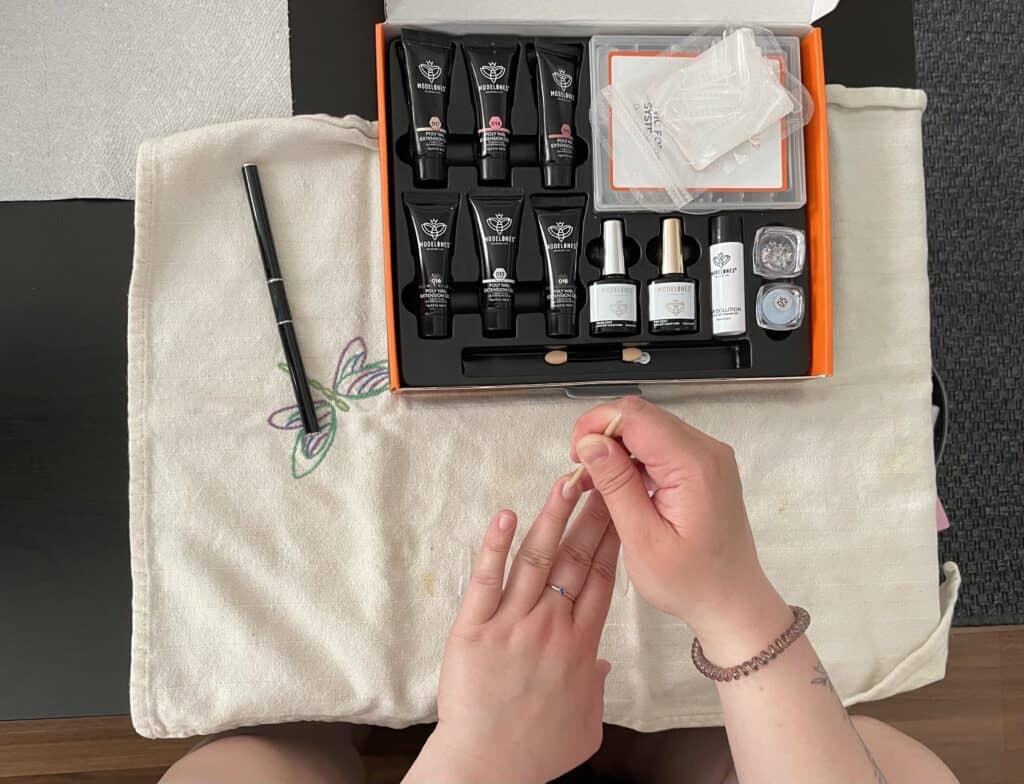
Modelones Poly Nail Gel Kit
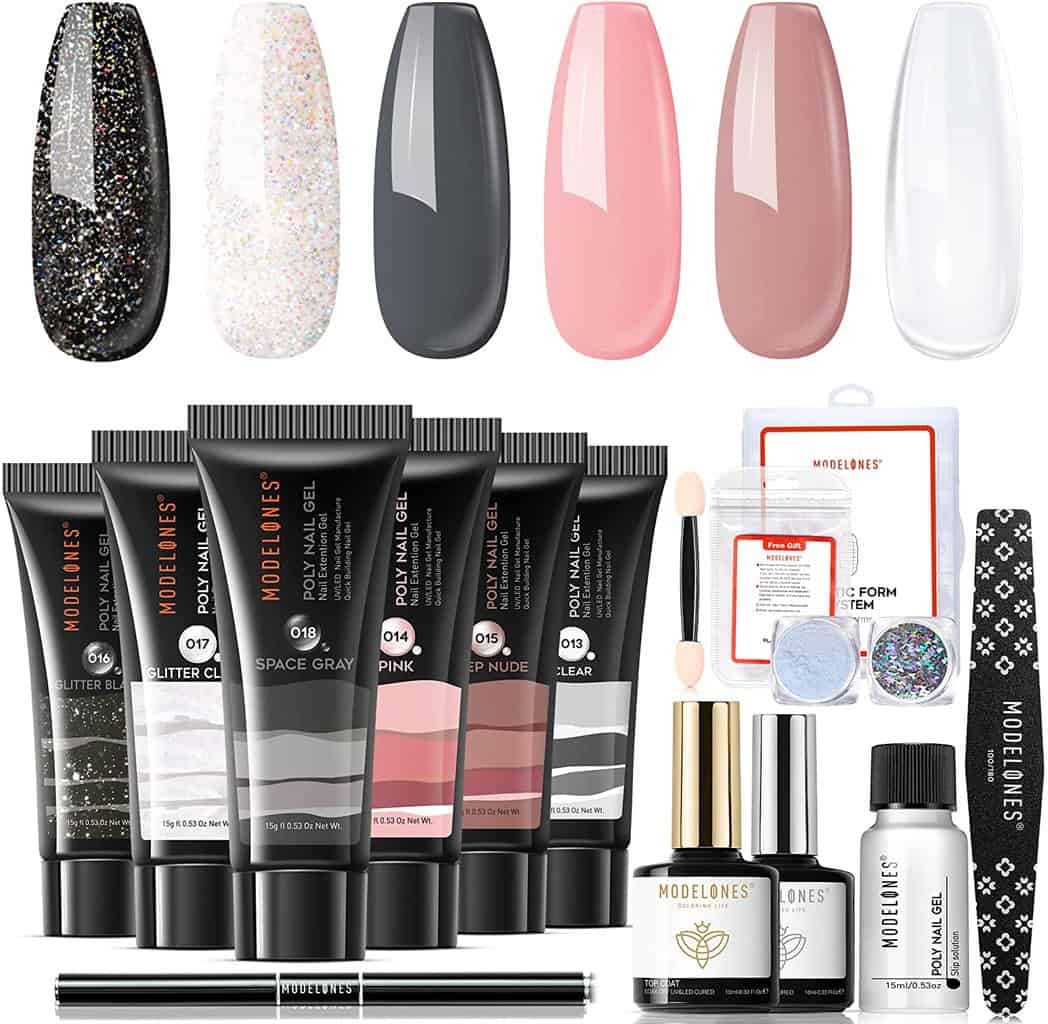
I absolutely love this kit! I actually tried this one out myself, and I’m in love with the manicures I’ve made so far! It comes with everything you’d need, other than an LED light. In my opinion, though, I find buying a separate, really good quality lamp will do you better in the long term anyway!
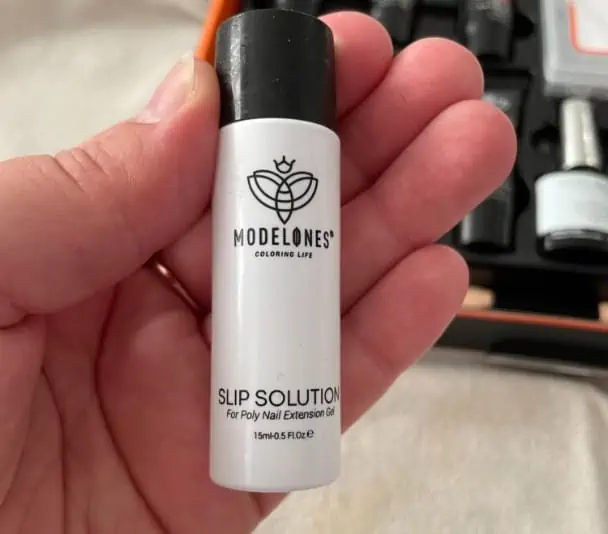
The kit has a wide range of Poly Gel colours, which I love. You get a Black glitter, A Silver glitter, a basic Black, a pale Pink, a Nude, and a Clear. They’ve even included star nail decals and an iridescent blue glitter that you can mix into any of the poly gels to create even more fun looks! Along with the poly gel, you also get the slip solution, a double-sided nail brush and spatula, a great nail file, and the base and top gel coats.
I’ve done two manicures with this kit, and I will say that it was so incredibly easy to use. The instructions were very clear, and if I have any future questions, their customer service is phenomenal! It takes a bit of getting used to, but once you get the hang of it, you will be in love with your nails. If you’re not sure how to apply Poly Gel, I’ll guide you through it at the bottom.
Pros
- Great range of colours for any mood
- Includes nail decals and nail glitter
- It has a fantastic nail file
- Modelones customer service is very good
- You get extra dual forms free of charge
Cons
- The Poly Gel tubes are a little small, so you don’t get that many manicures out of each colour
- They don’t offer all of their Polygel colours on Amazon, so you have to go to their website to order more.
- The slip solution is really small, so you’d have to order more once you’ve done a few manicures
- There isn’t an LED lamp included
Tomicca Poly Extension Gel Nail Kit
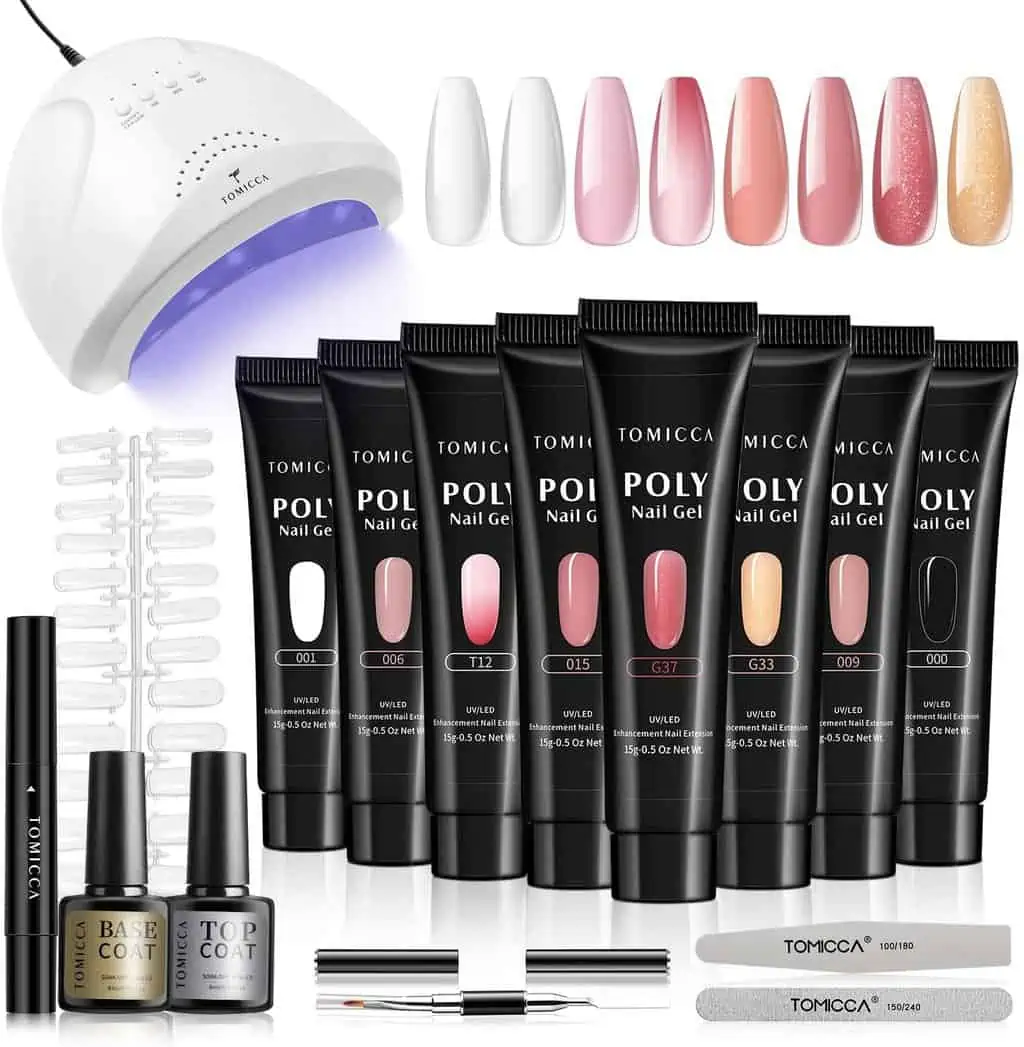
This kit is also a great pick! Tomicca is a well-known nail brand that makes other kits that include acrylic and gel, and dip. I would highly recommend you check those out if you’re looking to build up your kit a little more.
In this particular kit, you get six colors which are glitter Pink, glitter Purple, glitter Apricot, Pink, Light Pink, and clear. The Pink in this kit is actually color-changing, which is wild! Along with these great colours, you also get a nail file, nail buffer, double-sided nail brush, slip solution pen, dual forms, top and base coats, and an LED lamp.
Pros
- You get an LED lamp, which means you have everything you’ll need to do a manicure
- It has a great range of neutral nail colors
- You get a cool color changing shade
- The slip solution pen makes it a lot easier to spread the gel
Cons
- The lamp quality isn’t too great. It’s quite small.
- There aren’t as many dual forms in this kit as in other ones
- It doesn’t come with additional nail decorations
Makartt Poly Nail Gel Kit
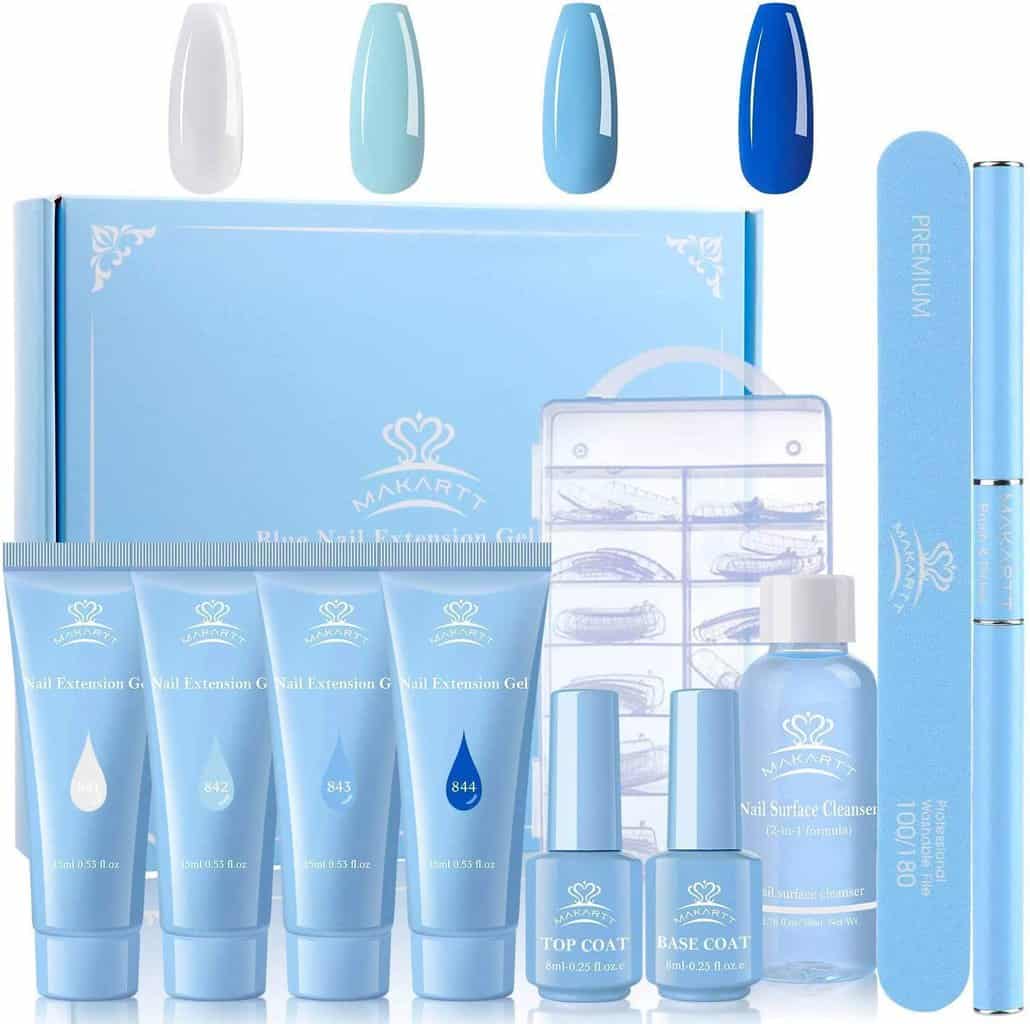
This poly gel set is great because it comes with a few color customization options. You can choose between Blue, Green, Pink and Purple. Each color set has three different poly gel hues and one clear gel. I think it’s great to have these options because sometimes sets come with random colors, which means you may not like every color.
Along with the poly gels, you get a box of dual forms, nail brush, slip solution, nail file, and base and topcoat. You don’t get an LED lamp, but you can order one with no problem!
Pros
- This kit comes in four different shades, so you can get whatever colour you love
- You get a box of dual forms, which means you won’t run out for a long time
- There aren’t as many chemicals in this formula, especially compared to acrylic powder
Cons
- I wish each set had a few more colour options, so you really get the full range of colour
- The poly gel tubes are quite small, so you don’t get a lot of use out of each one
Gelish Polygel Trial Kit
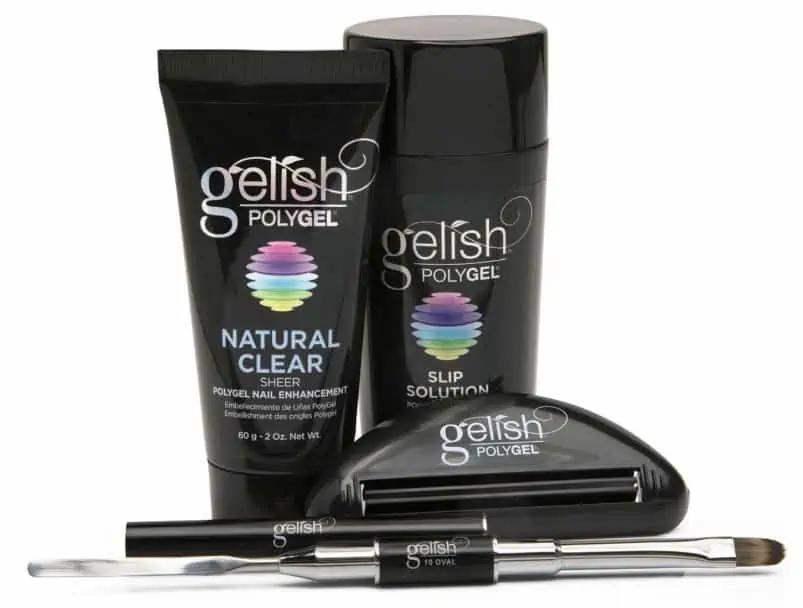
Gelish is a really popular, salon-quality brand that will give you gorgeous poly gel nails. The only issue with this kit is that it is rather expensive and you don’t get a range of poly gel colours and accessories. However, if you’ve been disappointed in cheaper unknown name brand kits before, you can be sure that these products will hold up.
In the kit, you get a clear poly gel tube, a bottle of slip solution, a mini LED light and a double-sided brush and spatula. The packaging is quite professional-looking and would fit nicely inside a travel bag.
Pros
- Salon quality poly gel ensures your nails will stay on for a long time
- You get a mini LED light which is perfect for on-the-go manicures
- The quality of the nail brush is excellent
- You can pick it up at your closest nail supply store
Cons
- It’s pretty expensive for the number of items you get
- There aren’t any additional decorations or accessories
Saviland Poly Gel Nail Kit
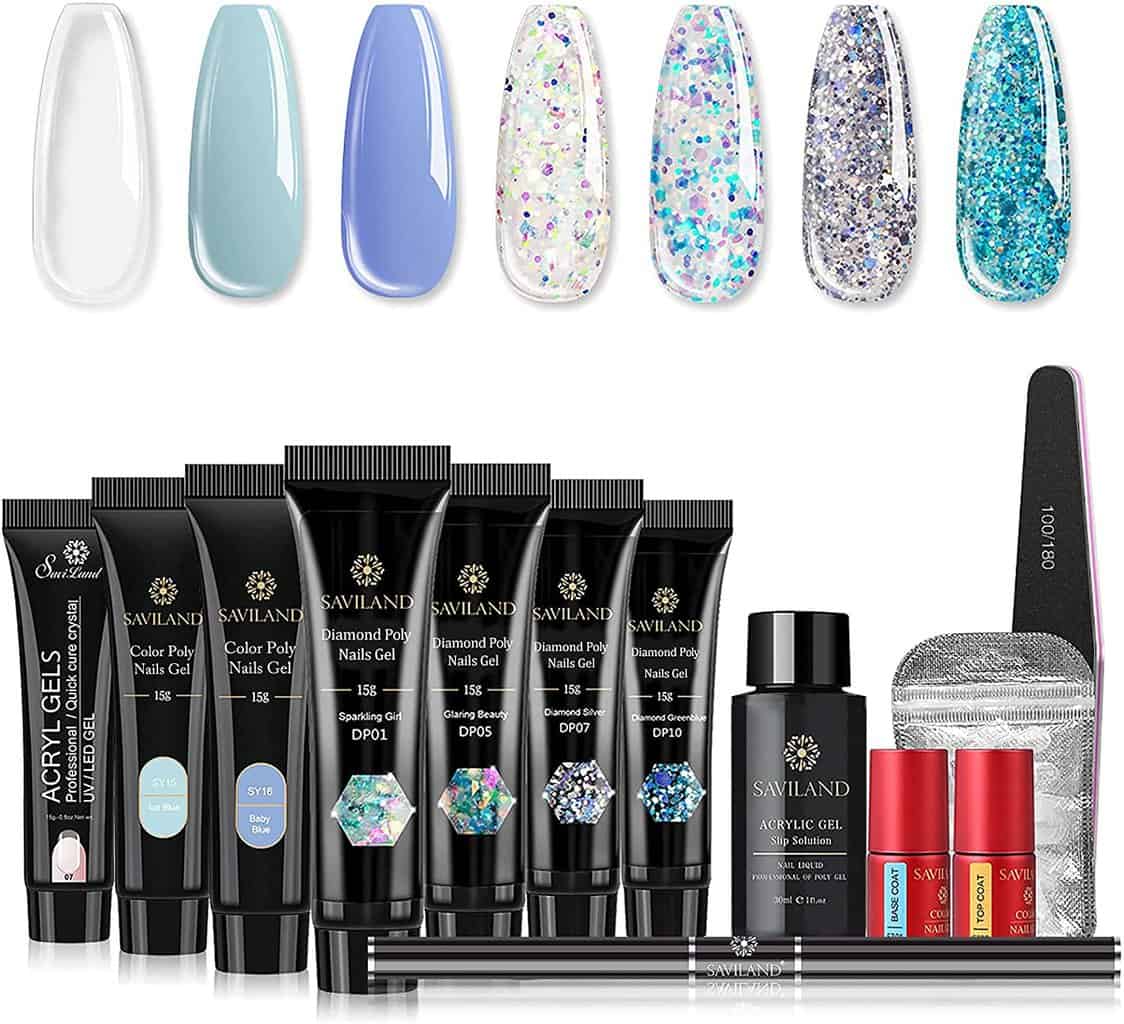
The Saviland poly gel kit is another popular pick on Amazon. You actually have two choices when it comes to creating extensions with this kit. You can use the trusty dual forms, or you can opt for nail extension stickers, which are most commonly used for acrylic nails. I love that they give you this option because sometimes dual forms can be tricky to use.
In this kit, you get seven different poly gel colours: clear, baby blue, lilac, purple, glitter silver, glitter purple, and glitter green. You also get the slip solution, nail brush, a pack of dual forms, a pack of nail extension stickers, a nail file, and a top and base coat.
Pros
- Good range of poly gel colours to work with
- Different options for creating the poly gel extensions
- You get an instruction booklet as well to guide you through the steps
Cons
- The poly gel tubes aren’t super big, so you won’t get many uses out of each tube
- It doesn’t offer a huge range of shades, so you’re stuck with one colour scheme
How To Do Polygel Nails: Photo Guide
1. First, start with all of your nail prep steps. You’ll want to clean underneath your nails, push back your cuticles, and lightly buff the surface of your nails to remove any residue. If your nails are quite long, then you’ll want to cut them down slightly. If you prefer to file them down, you can do that too!
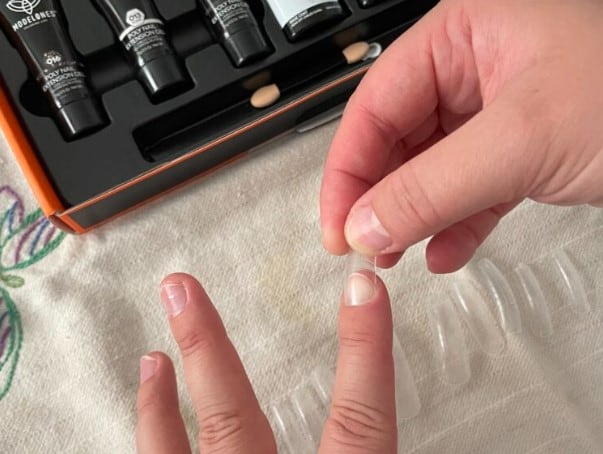
2. Next, grab your box of dual forms; it’s time to fit them into your nail beds. This is a really important step; take your time to make sure that you fit them properly. You want your nail forms to fit wall to wall but not be too big for your nail bed. If they are slightly too big, you can file parts away so that they fit your nail bed a little better.
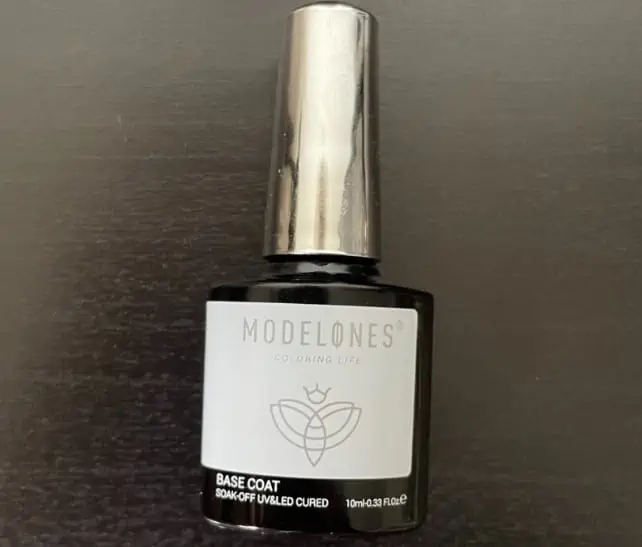
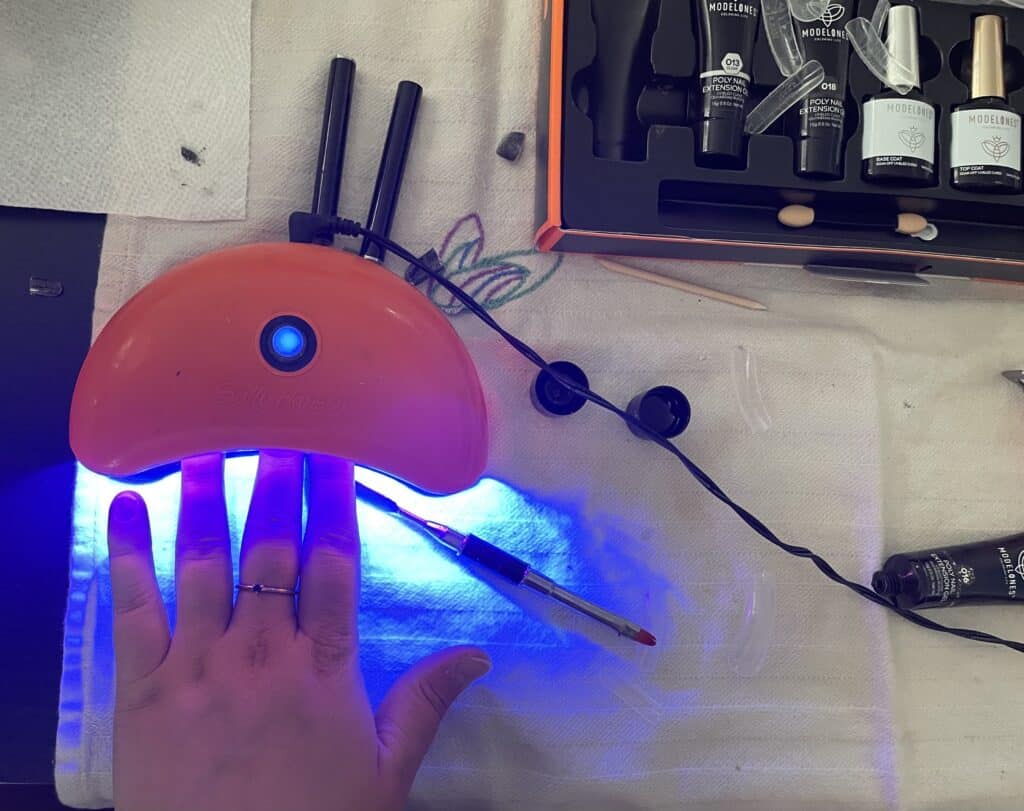
3. The next step is to go in with your base coat included in your kit. Don’t make a layer that is too thick; make sure to wipe the brush off slightly before application. After applying the base coat, cure it under your UV light for at least 60 seconds. I prefer to cure it for even longer, just to be safe.
4. Then, set up your station with a slip solution and get your brush ready for use. If your kit doesn’t have a slip solution, you can also use 70% rubbing alcohol. You also don’t need a lot of slip solution, so only pour out a little bit at a time as you go.
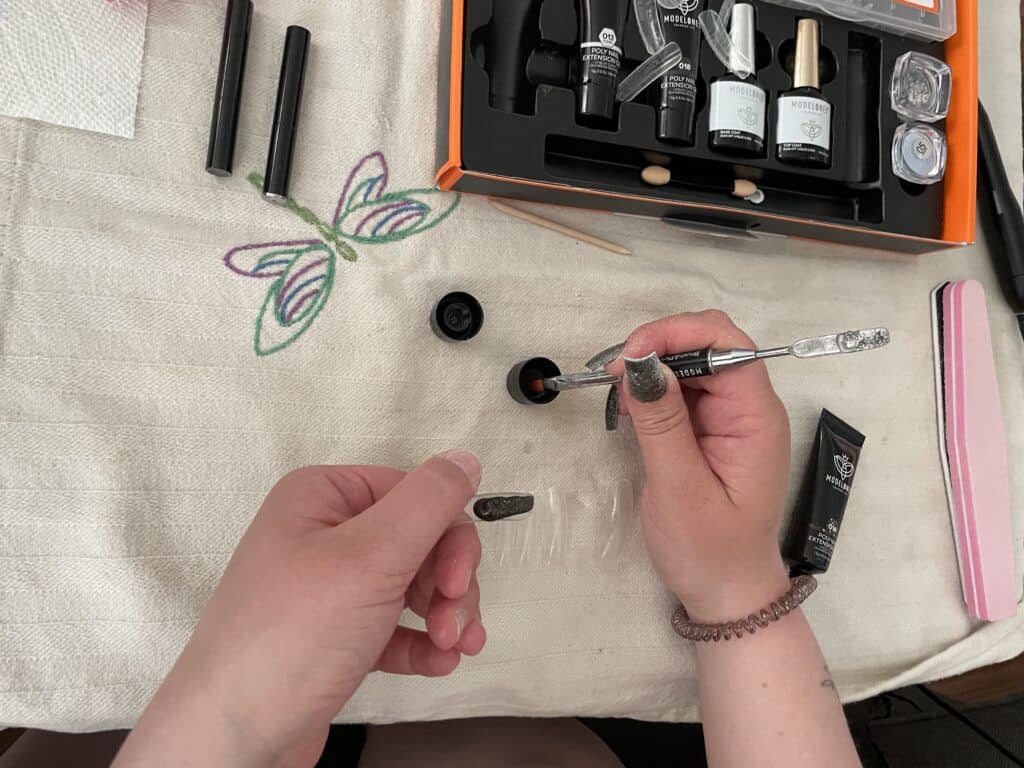
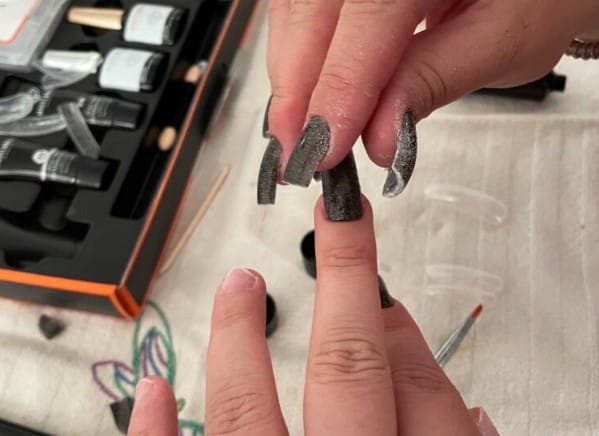
6. Once you have all of your station set up, you can start applying the poly gel to the nails. Grab your first dual form; you can start with any hand, but I recommend doing your non-dominant hand first. Squeeze some poly gel onto the spatula side of your brush and scrape it onto the dual form.
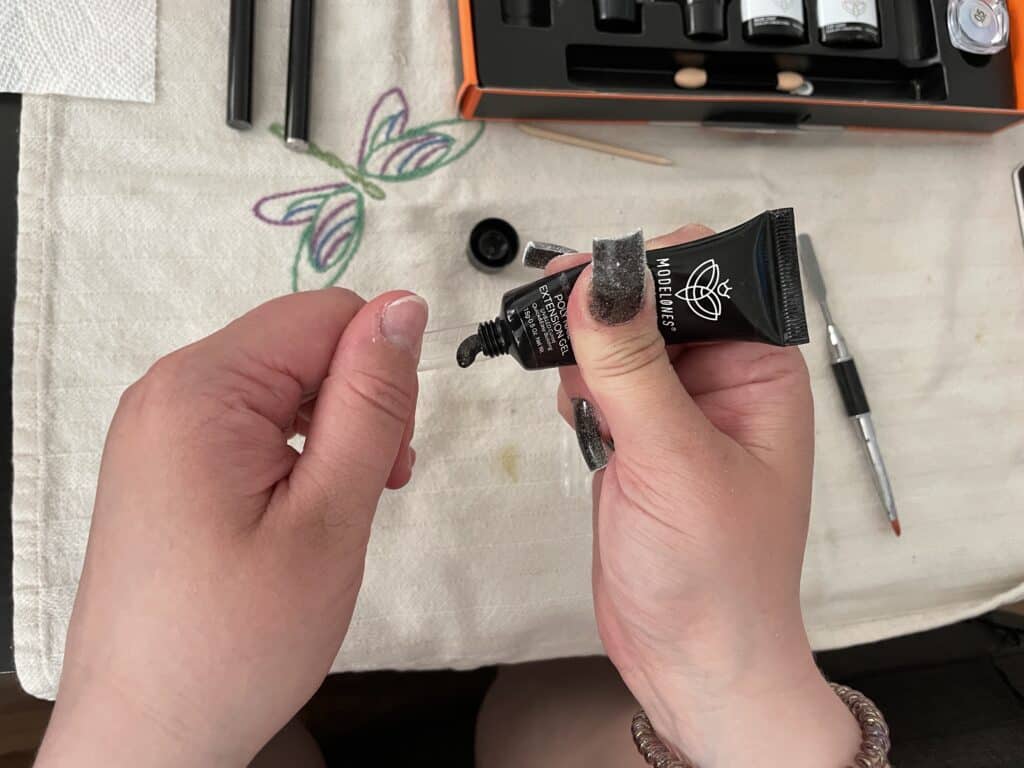
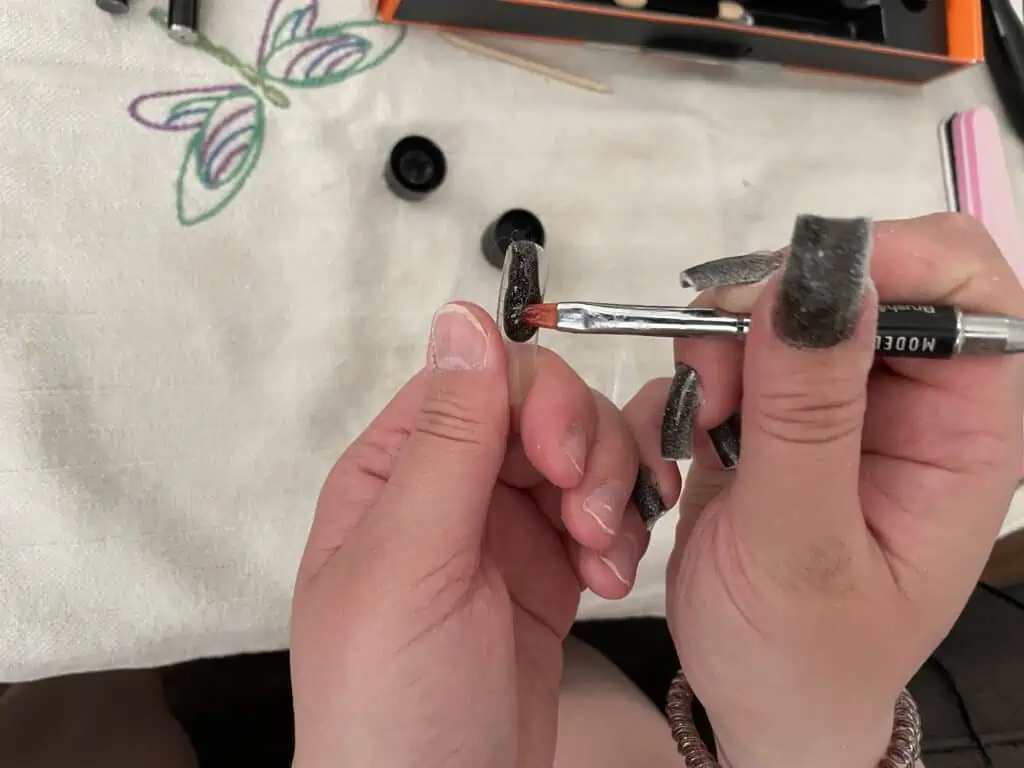
7. Once you have enough poly gel on your dual form, grab your brush and dip it into the slip solution. Wipe off any excess solution; you don’t want the brush to be too wet, or the nail won’t set when you cure it. Using the brush, you’ll sculpt the poly gel into a curved nail shape that, once cured, will be your actual false nail. Basically, you want to cover the dual form from wall to wall and also length-wise, depending on how long you want your nails to be. Don’t make the poly gel too thick around the cuticle area, as any overflow will be harder to clean up. You can also go underneath to smooth the nail out as well.
8. The next step is to apply and cure the nail. Gently place the dual form onto your bare nail, making sure to line up the nail bed area correctly. Then, cure it with the nail form on it so that it sets the nail properly; don’t worry, it will pop off easily after curing. I would recommend setting it for at least 60 seconds.
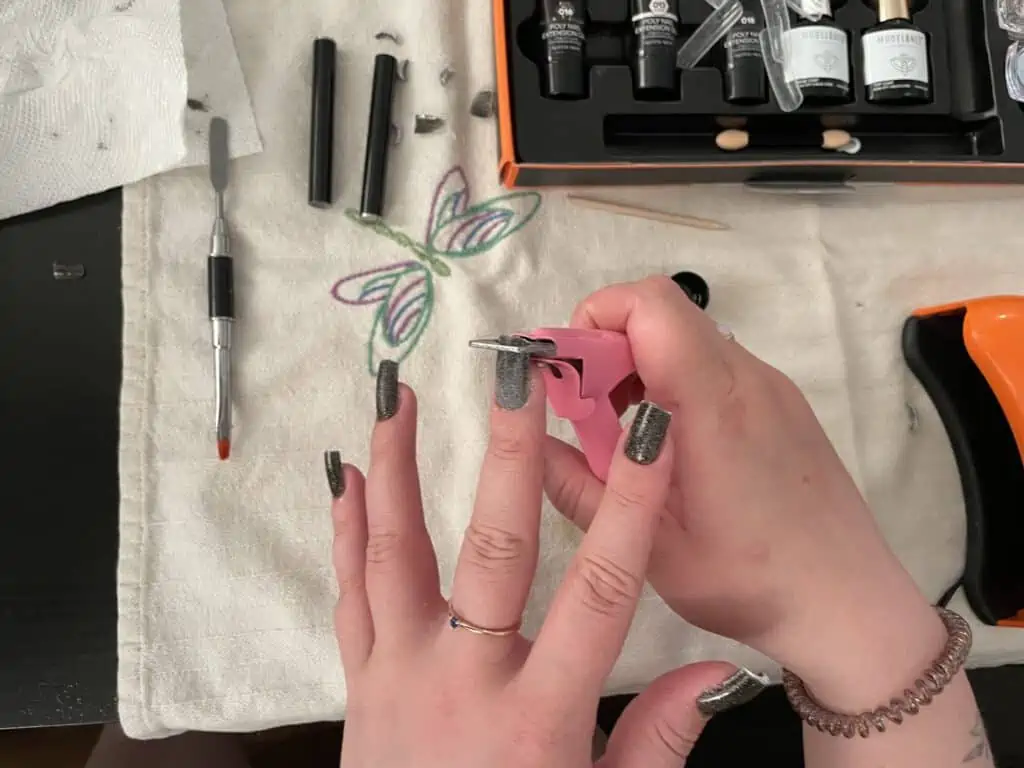
I find that the longer I leave it, the better it sets. Then, you can take the nail out of the UV lamp. It might be a little bit sticky, but don’t worry, that residue will come off. Now it’s time to pop the nail off. I usually start at the tip of the nail and gently squeeze at each side until I get to the nail bed. You can save each dual form for the next use, which is great!
10. Now, repeat each step on the rest of your nails.
11. Once all of your nails are done, take your nail trimmer and cut your poly gel nails to their desired length. I always measure them against the other hand as I go so that I don’t have any lopsided measurements. Once you have trimmed them all, it’s time to file and shape them. I use a nail drill, which I find makes it easier to shape the nails. You can also use a really good nail file and buffer, too though. Your goal with shaping is to remove any bumps or uneven texture of the poly gel. The good news is that poly gel nails will already be quite well-shaped as they set pretty uniformly in the dual form.
12. When you’re done shaping, it’s time to finish them off with the top gel coat included with your kit. Apply a thin layer of gel as one too thick will leave your nails looking uneven. Cure each nail for at least 60 seconds. Once you’re done, take a wipe and swipe off any sticky residue.
13. There you have it, your very own set of poly gel nails!
FAQ’s
Answer: I don’t find that poly gel nails are as hard to do as acrylic or bio gel nails. The dual forms really help you keep an even nail that requires minimal shaping and correcting. It will take a little bit of getting used to building the poly gel on the dual forms, but as you keep practicing, it will get better.
Answer: Yes, you do! The poly gel needs to be cured in order for it to set and stay on the nail. This is where a nail lamp comes in; once you’ve sculpted your nail gel, then you’ll cure it under the lamp for around 60 seconds.
Answer: I would say that poly gel nails are the easiest to complete at home by yourself. This is because the dual forms help you sculpt the nails as they are being cured. It can be quite hard to do gel or acrylic nails on your own because you need a very steady hand to shape them. Because of this, Poly Gel is my top choice for an at-home manicure.
Bottomline
Poly Gel nails have been around for a while, and I’ll definitely say that they are my favourite type of nails to do at home. They are virtually odourless, so you won’t be left with any chemical smells in your home for hours afterward. They are also really easy to do on your own, and they last quite long on the nails, given that you apply them properly.
My favourite kit on this list is the Modelones Poly Gel Nail Kit. It has everything that you need to create a beautiful set, and I love that it comes with a range of colours, which means that you don’t have to go looking for other colours if you’re feeling like creating a different look.
If you’re interested in reading more great nail articles, then check these out:
Cute Short Nails Inspiration and Ideas